Guides
How to Set Up Your First Profile in Undetectable and Get Started
How to Set Up Your First Profile in Undetectable and Get StartedGuides
When creating your first profile, you do not need to understand every anti-detect browser setting. Undetectable will fill in some parameters automatically, some should be selected for your specific task, and the additional sections can be left unchanged.
In this guide, we will go through the profile creation window in order: from the name and configuration to the connection, start page, and first launch. Along the way, we will cover how to choose a language, why the page sometimes cannot be stretched, and when you can work without a proxy.
1. Set the profile name
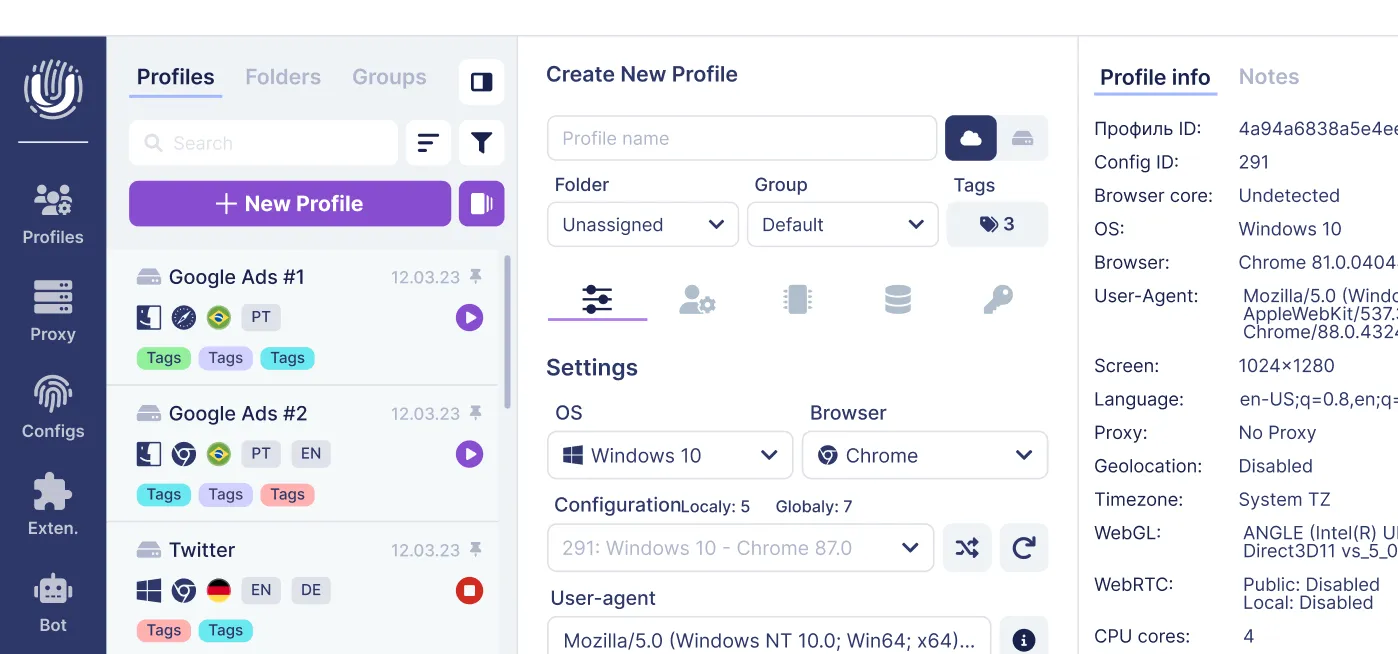
Click New Profile and replace the suggested name with something clear to you. For example:
- “Store — main account”;
- “Client A — social media”;
- “Site check — Germany”.
A profile stores a separate browser environment with its own settings and site data. A clear name will help you return to the right project when you have more profiles.
Next to the name, choose where to store it: locally on your computer or in the cloud, depending on the features available in your plan and your task. Cloud profiles are convenient for working from different devices and in a team. The storage location itself does not change the connection IP.
Below are Folder and Tags — a folder and tags for organizing profiles. You can leave them empty for the first launch.
2. Choose the OS, browser, and configuration
On the first tab, Settings, marked with the sliders icon, configure three related fields.
OS — operating system
For your first profile, choose an OS from the same family as the one installed on your computer:
- if you work on Windows — Windows;
- if you work on Mac — macOS.
The developers recommend this option for a standard start. Choosing a different OS makes sense when a specific task requires it. Configuration guidelines.
Browser — browser
For your first profile, you can choose Chrome. If your project requires another browser, select the corresponding option — the configurations also include Yandex Browser.
Here you choose which browser will be represented in the profile configuration.
Configuration — a ready-made set of parameters
After choosing the OS and browser, select a suitable configuration. For a standard start, choose a current available browser version.
The configuration contains browser and device characteristics used when creating the profile. This means you do not have to compile the entire set of parameters yourself.
After selection, the following will be filled in automatically:
- User-Agent — information about the browser and system;
- Screen — screen parameters;
- CPU cores — the number of processor cores;
- Memory GB — the amount of memory reported to websites.
You do not need to transfer these values manually from anywhere. For your first profile, leave the User-Agent, CPU cores, and Memory GB from the configuration. These fields describe the environment for websites; they do not allocate additional computer resources to the profile.
On the right, in Profile info, you can view the final parameters. If you choose a different configuration, check this summary again.
If there are few configurations
You can purchase additional configurations in the store by selecting the OS and browser you need. After purchase, they will appear in My Configurations. If the new configuration is not yet displayed in the program, refresh the list using the circular arrow button next to the Configuration field. How to purchase configurations.
However, you do not need to buy a configuration specifically for your first launch if a suitable one is already available. Free and paid configurations do not differ in quality — purchasing only expands your selection. Developer recommendations.
3. Check Screen and choose a language
Stay on the first tab. Under User-Agent are the screen, processor, and memory settings, and below them is Languages.
Screen — screen resolution
If Default is selected in the Screen field, the value from the configuration is used. You can see the resolution itself on the right in Profile info: for example, 1920 × 1080.
Before saving, check whether it is suitable for working on your screen. A high resolution does not automatically make a profile better: on a small laptop, it may be inconvenient.
There is one important detail to know in advance: when resolution emulation is enabled, stretching the window does not increase the page display area. The outer window may become larger, while the page inside remains the same size.
This behavior is related to the emulation setting. If you want to freely change the page width, for example to place the browser next to a spreadsheet, you will need to change Window size later on the Advanced tab. We will get to this setting in order.
Choose the emulated resolution before creating the profile: after creation, it is fixed. Manual Screen selection is not available for all configurations; according to the documentation, it is available for Windows, but not for mobile configurations.
Languages — profile languages
Languages determines the language preferences that the profile reports to websites. Do not confuse this field with the Undetectable interface language.
To choose a language:
- Click the Languages field.
- Find the desired language and add it.
- Remove unnecessary options using the cross next to the name.
- Check the resulting list.
For a simple scenario, start with one required regional variant. For example:
| Task | Profile language |
| Checking an English-language site for the United States | English (United States) |
| Working with the British English version | English (United Kingdom) |
| Checking the German-language version | German (Germany) |
The codes under the selected languages, for example en-US, are generated from your selection. You do not need to enter them manually.
Choose the language deliberately for your workflow. If you are checking a German version of a site from Germany, it is logical to use German and a connection with a German IP. At the same time, for English-language work in Germany, English may be the correct choice: one country does not mean one mandatory language.
Language and connection are configured separately. Choosing English (United States) does not provide a US IP, and connecting a US proxy does not replace checking Languages.
If later the site opens in another language, first check the profile language. If it is correct, check the settings of the site or account itself: they may have their own language preference.
4. On the next tab, configure the connection and import cookies if necessary
Go to the second tab — General, with the user and gear icon.
Here you choose which connection the profile will use to open websites. A proxy is not needed for every task.
If a proxy is not required
Select No Proxy. The profile will use the computer’s current connection.
There are two common scenarios:
- Without VPN: websites will usually see your internet provider’s public IP.
- With VPN: websites will see the VPN exit IP if Undetectable traffic is actually routed through it.
The VPN must work for the application itself. An extension enabled in another browser does not change Undetectable’s connection. If split tunneling is enabled in the VPN, you should also check that the browser is not excluded from the tunnel.
Several profiles with No Proxy can access the internet from the same IP. Their site data remains separated.
If you do not need to change the connection region, leaving No Proxy is perfectly fine. For example, you can use it to get familiar with the program or separate work sessions.
If you need a proxy
Select a previously added proxy or New Proxy and enter the provider’s details:
- Connection protocol.
- Address and port.
- Login and password, if required.
Use the protocol from the provider’s data. Leave the IP change link field empty if you were not given such a link.
Click Check Proxy. If the check fails, first verify the address, port, protocol, and authorization. Changing the configuration or language will not fix a connection error. Input formats are covered in the proxy setup instructions.
Do you need to import cookies
On this same tab, you can import cookies from a file.
Cookies are data that websites save in the browser. They may contain site preferences and session information. Importing is needed if you are transferring such data to a new profile.
If you are creating a profile from scratch and do not have a cookies file, skip the import. While you work, websites will save their cookies in the usual way.
Loading cookies does not guarantee that authorization will be restored: the site may end the old session or request login again. Allowing the import of expired cookies is also not required for a normal first launch — it does not extend their validity on the website side.
5. Open Advanced and check only the necessary parameters
The third tab, with the microchip icon, contains advanced fingerprint settings.
Here you will find Canvas, WebGL, AudioContext, ClientRects, WebRTC, geolocation, time zone, and other parameters. They are intended for users who understand what behavior needs to be changed.
For your first profile, leave the developers’ standard values. This is the recommended starting point; there is no need to enable all noise settings or disable all technologies at once. Default profile settings.
To navigate this section, it is enough to understand the purpose of the main groups:
- Canvas and WebGL are related to graphics rendering.
- AudioContext relates to audio processing.
- ClientRects and Fonts relate to the geometry of page elements and fonts.
- Noise means making changes to the data being read. More noise does not automatically mean a better-configured profile.
- WebRTC is used for calls and data transfer in the browser. Disabling it completely may interfere with some website features.
If you need to freely resize the page
Here we return to the choice you made when checking Screen.
Find Window size. If you need a freely resizable page area, disable size emulation: switch Emulate to System.
After launch, check the result: stretch the window and make sure the page area changes with it. If a fixed resolution suits your task, leave emulation enabled.
This mode also affects the screen parameters that the profile reports to websites. Therefore, decide on it during the initial setup, before ongoing work in accounts.
If only the text seems small, use page zoom in the browser menu. This is a separate setting: increasing the text size does not disable resolution emulation.
Time zone and geolocation
For the first launch, keep the default modes, then check the result for your task.
Timezone is responsible for the time zone that the website sees through the browser. The English (United States) language by itself does not set the time to New York or Los Angeles. If you use a connection from another region, check the time zone as well.
Geolocation refers to the location that the browser can provide upon a separate request from a website. This is a different mechanism from approximate country detection by IP.
If the website does not require access to location for your task, you do not need to allow it specifically for profile setup.
6. The Cookies section can be left unchanged
The next tab, with the cookie icon, is intended for working with the profile’s cookies.
Here you can import data, view it, and edit it if necessary. JSON and NETSCAPE formats are supported. Import is available from a file or text. Working with cookies.
If you already imported cookies on the previous tab, you do not need to upload the same file again. If you are starting with a clean profile, simply move on.
An empty section in a new profile is normal. You do not need to fill it in manually for the first launch.
7. Accounts — login data for websites
The last tab, with the key icon, works like the profile’s password manager.
You can add the required account details in advance using Add or import them from a file. Viewing, editing, and deleting entries are also available here. Account management.
If you do not need to add anything in advance, leave the section empty. Data will appear here when you log in to websites in this profile. Description of how the Accounts tab works.
Adding an entry to Accounts does not create an account on the website or log you in by itself. These are saved details for working with an existing account.
8. Choose the start page
Now look at the right side of the window. Under the Profile info summary are the Start page and At profile start fields.
They help configure what you will see when opening the profile.
Start page — which pages to open
Enter the full address of the desired site. This can be a work service, a store dashboard, or a connection check page.
If you need to open several pages, enter their addresses separated by spaces. For an empty tab, enter about. Start pages and input formats.
At profile start — how to start working
Choose the appropriate scenario:
- Open the start page — open the specified start pages.
- Continue where you left off — return to the tabs from the previous session.
If you entered a new address in Start page but left continuation of the previous session enabled, do not expect the browser to start from that address every time it launches. Check both fields.
For the first launch, you can choose an IP check page as the start page. After checking, replace it with your work site or enable tab restoration.
9. Create the profile and check the result
Before launching, look at Profile info on the right. Verify the selected OS, browser, resolution, language, and proxy.
At the bottom of the window, the following options are available:
- Create — create the profile for later launch.
- Open — create the profile and open it immediately.
- Lightning button — Quick Launch, a temporary launch with the profile deleted after closing.
For ongoing work, choose Create or Open. A temporary launch is not suitable if you want to save the environment and return to it later.
After opening, perform a quick check.
Connection. Open the IP check specifically inside the profile. Check IP Address and Country. With No Proxy and no VPN, you should expect the current connection; with a VPN — its exit IP; with a proxy — the proxy IP. The city by IP may be determined approximately.
Language and time. On the browser information page, find language, languages, and timeZone. Check whether they match your task.
Window. Resize it. If you selected the mode without emulation, the page area should resize together with the window. Separately, make sure the text is comfortable to read.
Work site. Open the required service and check the necessary functions. If you use a VPN or proxy and it is important to rule out a direct public IP, additionally perform a WebRTC check.
Relaunch. Close the profile and open it again from the list. Make sure the profile has been saved and launches with the required pages.
After that, continue working in the same profile. You do not need to create a new one every time you log in.
If something went wrong
| Problem | What to check |
| The profile shows a different country or IP | The selected proxy and whether traffic goes through the VPN |
| The profile reports the wrong language | Languages and any remaining selected languages |
| The profile language is correct, but the site is in another language | The site or account settings |
| The window stretches, but the page remains the same size | Emulation in Window size |
| The page area changes, but the text is small | Page zoom in the browser menu |
| Old tabs open instead of the start site | The At profile start mode |
| After importing cookies, the site asks you to log in | The session may have ended; log in in the usual way |
| The proxy does not pass the check | Address, port, protocol, and authorization |
If you later change the VPN, proxy, or connection region, check the IP, language, and time zone again. When working with No Proxy, the profile uses the computer’s current connection — the previous VPN IP is not fixed to it.
For more complex cases, there is a browser fingerprint audit guide: it will help you understand which parameters differ from the expected ones and what to check first.
Related posts
View all articlesJoin 450,000+ users who chose Undetectable
- Advanced anti-detection technology
- Unlimited local profiles from $49
- The perfect solution for multi-accounting